---
title: Fabric Lakehouse에서 공공데이터 API 호출하기
description: 관세청 수출입 실적 같은 공공데이터 API를 Fabric Python 노트북에서 직접 호출해 Lakehouse 테이블에 쌓는 과정을 캡처로 따라갑니다. 인증키는 Azure Key Vault에 넣고 꺼내 씁니다.
date: 2026-09-20
tags: [fabric, lakehouse, notebook, python, key-vault]
author: Lissa
source: https://interlinear.work/study/api-in-fabric/
---
PC에서 Python으로 공공데이터 API를 받아 파일로 쌓고, 그 파일을 다시 Fabric에 올리는 일은 번거롭습니다. 이 글에서는 Fabric 노트북이 API를 직접 호출해 Lakehouse 테이블에 적재하도록 구성합니다. 예제는 관세청 "품목별 국가별 수출입실적" API이고, 인증키는 코드에 적지 않고 Azure Key Vault에서 꺼내 씁니다. Fabric 평가판 용량의 작업 영역에서 확인했습니다.
## 1. Lakehouse 만들기
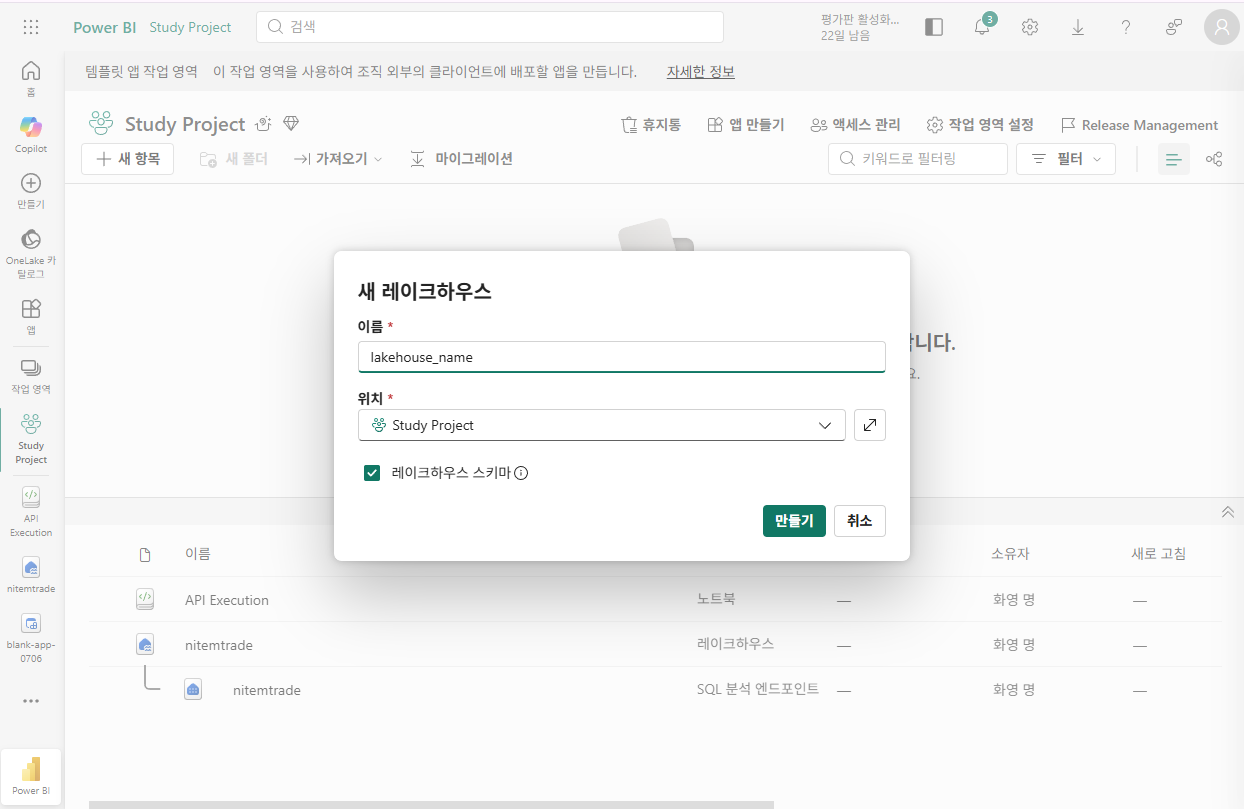
1. 데이터를 저장할 Lakehouse를 생성합니다.
2. 레이크하우스 스키마도 체크합니다.
!스키마를 켜면 테이블을 `dbo`, `raw`처럼 폴더 나누듯 묶어서 관리할 수 있습니다. 테이블 경로는 `Tables/dbo/테이블명`이 되고, 이 옵션은 Lakehouse를 만든 뒤에는 바꿀 수 없어서 처음에 정해 둡니다
## 2. 노트북 만들기
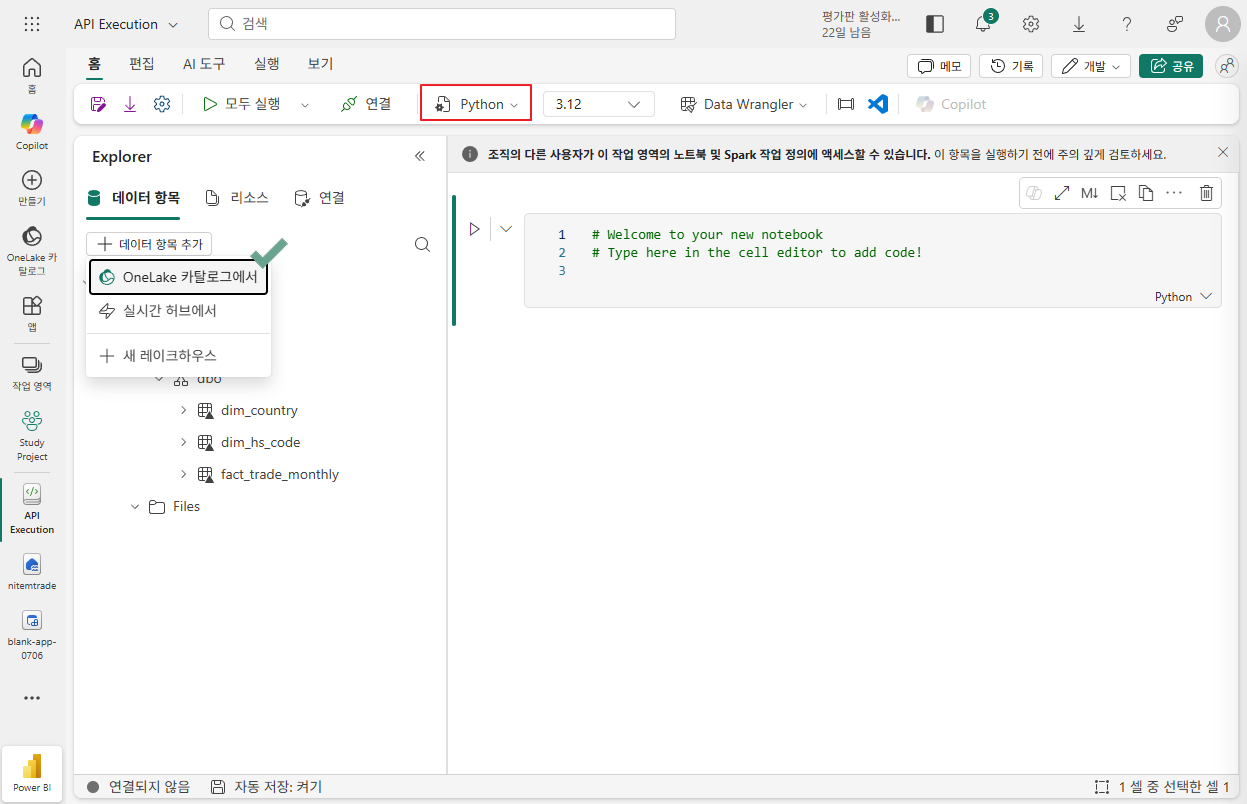
1. 새 노트북을 생성합니다.
2. 왼쪽의 데이터 항목탭에서 데이터 항목 추가를 클릭하고 "OneLake 카탈로그에서" 앞서 만든 Lakehouse를 선택합니다.
!Lakehouse를 붙여 두면 노트북이 이를 기본 저장소로 삼습니다. 코드에서 긴 주소 없이 `/lakehouse/default/Files/...` 같은 경로로 파일을 읽고 쓸 수 있고, 왼쪽 탐색기에서 적재된 테이블과 파일을 바로 확인할 수 있습니다
3. 상단에 사용할 언어를 Python으로 변경합니다.
## 3. 기본 설정과 키 적용하는 파이썬 코드 작성
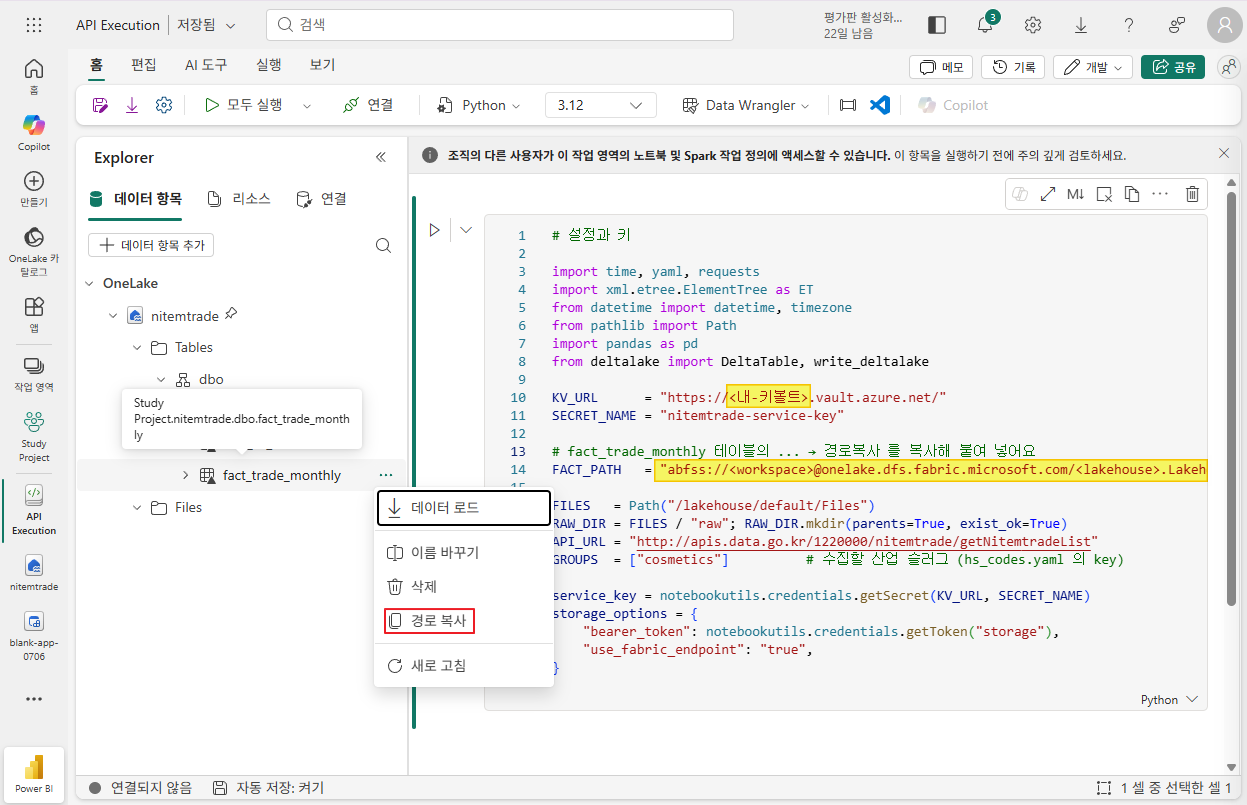
```python
import time, yaml, requests
import xml.etree.ElementTree as ET
from datetime import datetime, timezone
from pathlib import Path
import pandas as pd
from deltalake import DeltaTable, write_deltalake
KV_URL = "https://<내-키볼트>.vault.azure.net/"
SECRET_NAME = "nitemtrade-service-key"
# fact_trade_monthly 테이블의 ... → Properties → ABFS path 를 복사해 붙여 넣어요
FACT_PATH = "abfss://@onelake.dfs.fabric.microsoft.com/.Lakehouse/Tables/fact_trade_monthly"
FILES = Path("/lakehouse/default/Files")
RAW_DIR = FILES / "raw"; RAW_DIR.mkdir(parents=True, exist_ok=True)
API_URL = "http://apis.data.go.kr/1220000/nitemtrade/getNitemtradeList"
GROUPS = ["cosmetics"] # 수집할 산업 슬러그 (hs_codes.yaml 의 key)
service_key = notebookutils.credentials.getSecret(KV_URL, SECRET_NAME)
storage_options = {
"bearer_token": notebookutils.credentials.getToken("storage"),
"use_fabric_endpoint": "true",
}
```
1. 키는 Azure의 Key Vault를 사용합니다.
! 실행 전에 Fabric에서 노트북을 실행하는 계정에 Key Vault 권한을 꼭 할당해야 합니다.
! 할당할 권한은 "Key Vault 비밀 사용자"입니다.
! Key Vault의 비밀을 생성/관리하려면 "Key Vault 비밀 관리자" 권한을 할당합니다.
2. Path는 테이블의 ...에서 경로복사해서 붙여 넣습니다.
## 4. Key Vault 비밀 만들기
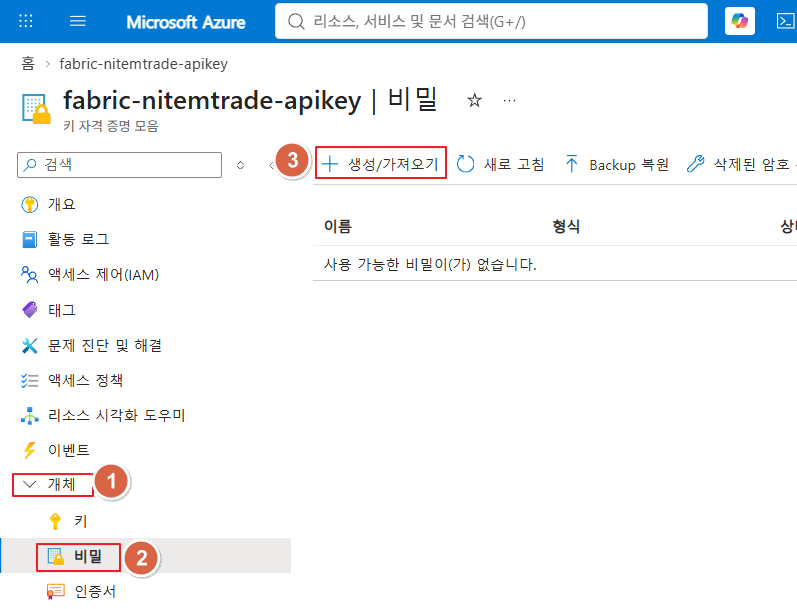
1. Key Vault 리소스에 들어가서 왼쪽의 개체 > 비밀을 선택합니다.
2. 상단의 생성/가져오기를 클릭합니다.
## 5. Key Vault 비밀 만들기
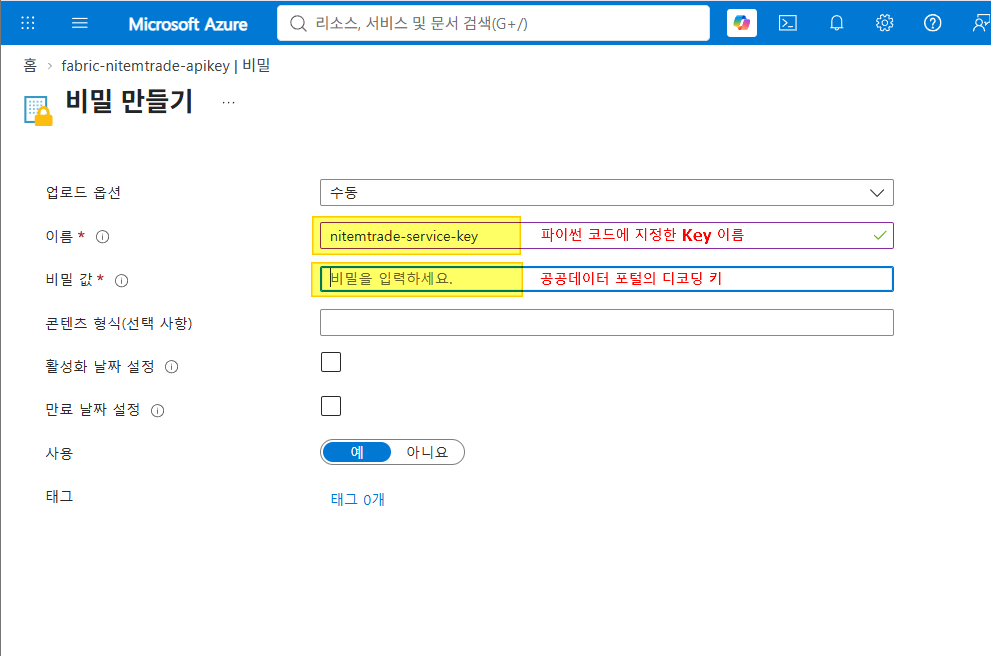
3. 비밀의 "이름"은 파이썬 코드에 지정한 Key 이름을 입력합니다.
4. "비밀 값"은 공공데이터 포털의 디코딩 키를 입력합니다.
## 6. 수집 대상 만들기
```python
hs_cfg = yaml.safe_load(
(FILES / "config/hs_codes.yaml").read_text(encoding="utf-8")
)
countries = yaml.safe_load(
(FILES / "config/countries.yaml").read_text(encoding="utf-8")
)["targets"]
codes = [
str(c)
for g in GROUPS
for c in hs_cfg[g]["codes"]
]
# 최근 3개월이 걸친 연도만 다시 받는다 (잠정치 정정 반영)
now = datetime.now()
years = sorted(
{
now.year if now.month - i > 0 else now.year - 1
for i in range(3)
},
reverse=True,
)
total = len(years) * len(codes) * len(countries)
print(
f"연도 {years} × 코드 {len(codes)} "
f"× 국가 {len(countries)} = {total} 호출"
)
```
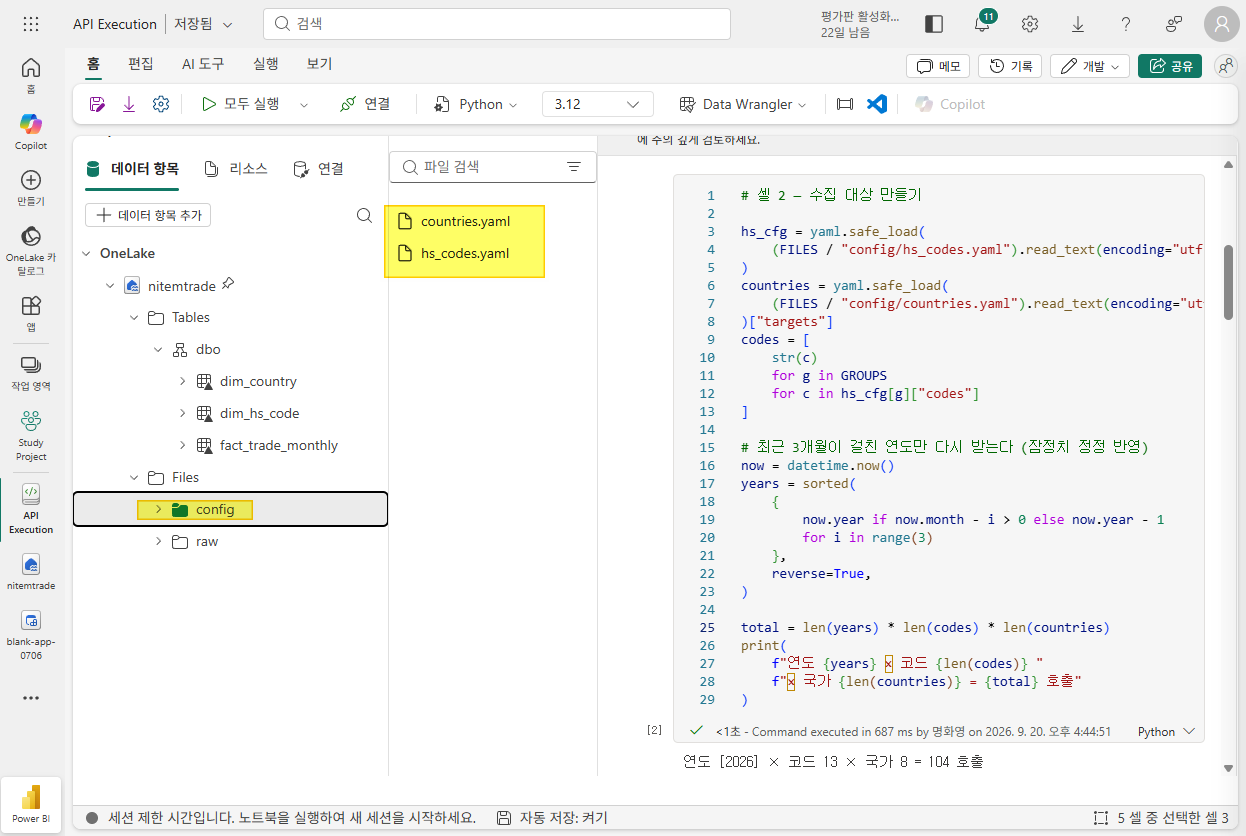
1. Lakehouse 파일에 config 하위 폴더를 생성하고 HS code yaml 파일과 countires yaml을 업로드합니다.
## 7. 호출하고 파싱하기
```python
class ApiError(Exception):
def __init__(self, code, msg):
self.code = code
super().__init__(f"[resultCode={code}] {msg}")
def parse_xml(xml_bytes):
root = ET.fromstring(xml_bytes)
code = root.find(".//resultCode")
msg = root.find(".//resultMsg")
# 게이트웨이 오류 형식 (한도 초과 22 등)
if code is None:
code = root.find(".//returnReasonCode")
msg = root.find(".//returnAuthMsg")
code_txt = ""
if code is not None:
code_txt = (code.text or "").strip()
if code_txt != "00":
msg_txt = ""
if msg is not None:
msg_txt = (msg.text or "").strip()
raise ApiError(code_txt, msg_txt)
rows = [
{c.tag: (c.text or "").strip() for c in item}
for item in root.iter("item")
]
df = pd.DataFrame(rows)
# 총계 행을 빼기
if "year" in df:
return df[df["year"] != "총계"]
return df
frames, failures, stopped = [], [], False
for year in years:
for hs in codes:
for cn in countries:
params = {
"strtYymm": f"{year}01",
"endYymm": f"{year}12",
"cntyCd": cn,
"hsSgn": hs,
"serviceKey": service_key,
}
try:
resp = requests.get(
API_URL, params=params, timeout=30
)
resp.raise_for_status()
df = parse_xml(resp.content)
# 정상 응답만 보관
raw_file = RAW_DIR / f"{hs}_{cn}_{year}.xml"
raw_file.write_bytes(resp.content)
frames.append(df)
except ApiError as e:
failures.append((hs, cn, year, e.code))
# 일 호출 한도 → 여기서 멈추고 모은 것만 적재
if e.code == "22":
stopped = True
break
except Exception as e:
# 예외 메시지엔 URL(키)이 섞일 수 있어 타입만 남겨요
failures.append(
(hs, cn, year, type(e).__name__)
)
time.sleep(0.5)
if stopped:
break
if stopped:
break
print(
f"성공 {len(frames)} / 실패 {len(failures)} "
f"/ 한도중단 {stopped}"
)
```
1. 셀 실행 시간은 호출하는 데이터 양에 따라 증가합니다.
## 8. 팩트 테이블 모양으로 가공
```python
raw = pd.concat(
[f for f in frames if not f.empty],
ignore_index=True,
)
def num(s):
return pd.to_numeric(s, errors="coerce")
def to_int(s):
return num(s).fillna(0).astype("int64")
def to_weight(s):
return num(s).round().astype("Int64")
fact = pd.DataFrame({
"period": raw["year"].str.replace(
".", "-", regex=False
),
"hs_cd": raw["hsCd"].astype(str),
"item_name": raw["statKor"].astype(str),
"cnty_cd": raw["statCd"].astype(str),
"cnty_name": raw["statCdCntnKor1"].astype(str),
"exp_dlr": to_int(raw["expDlr"]),
"imp_dlr": to_int(raw["impDlr"]),
"exp_wgt": to_weight(raw["expWgt"]),
"imp_wgt": to_weight(raw["impWgt"]),
"bal_payments": to_int(raw["balPayments"]),
})
fact["period_date"] = pd.to_datetime(
fact["period"], format="%Y-%m"
).astype("datetime64[us]")
fact["hs_digits"] = fact["hs_cd"].str.len().astype("int64")
fact["hs4"] = fact["hs_cd"].str[:4]
fact["hs6"] = fact["hs_cd"].str[:6]
fact["fetched_at"] = pd.Timestamp.now(tz="UTC").as_unit("us")
# 업로드한 테이블과 열 순서를 똑같이 맞춰요
table = DeltaTable(
FACT_PATH, storage_options=storage_options
)
target_cols = [f.name for f in table.schema().fields]
fact = fact[target_cols].drop_duplicates(
["period", "hs_cd", "cnty_cd"]
)
```
1. API 응답의 열 이름을 테이블의 열 이름으로 바꾸고, 금액과 중량은 숫자로, 기간은 날짜로 변환합니다.
2. 열 순서를 기존 테이블과 똑같이 맞춥니다. 순서나 타입이 다르면 다음 단계의 MERGE에서 오류가 납니다.
3. 기간, 품목, 국가가 같은 행은 한 번만 남깁니다.
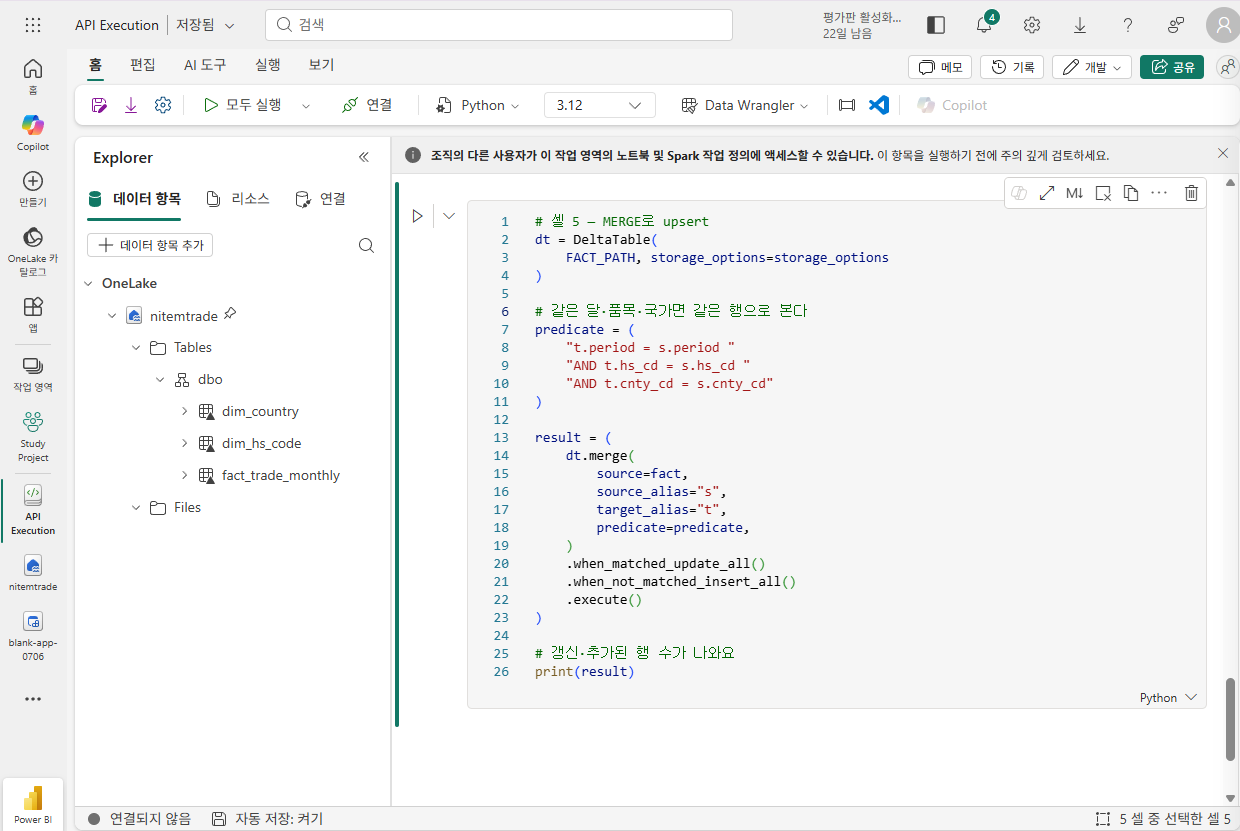
## 9. MERGE로 upsert
```python
dt = DeltaTable(
FACT_PATH, storage_options=storage_options
)
# 같은 달·품목·국가면 같은 행으로 본다
predicate = (
"t.period = s.period "
"AND t.hs_cd = s.hs_cd "
"AND t.cnty_cd = s.cnty_cd"
)
result = (
dt.merge(
source=fact,
source_alias="s",
target_alias="t",
predicate=predicate,
)
.when_matched_update_all()
.when_not_matched_insert_all()
.execute()
)
# 갱신·추가된 행 수가 나와요
print(result)
```
1. 기간, 품목, 국가가 같은 행이 이미 있으면 새 값으로 덮어쓰고, 없으면 새 행으로 추가합니다.
2. 같은 노트북을 여러 번 실행해도 데이터가 중복되지 않습니다.
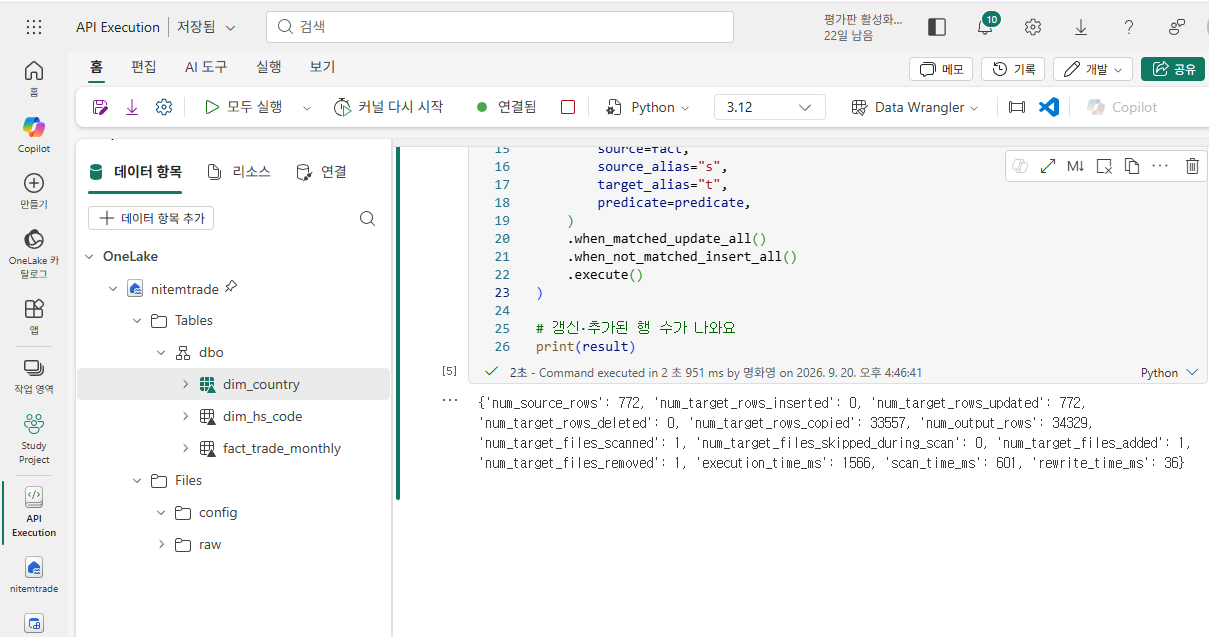
## 10. 모든 셀 실행 후 결과 확인
```json
{'num_source_rows': 772, 'num_target_rows_inserted': 0, 'num_target_rows_updated': 772, 'num_target_rows_deleted': 0, 'num_target_rows_copied': 33557, 'num_output_rows': 34329, 'num_target_files_scanned': 1, 'num_target_files_skipped_during_scan': 0, 'num_target_files_added': 1, 'num_target_files_removed': 1, 'execution_time_ms': 1566, 'scan_time_ms': 601, 'rewrite_time_ms': 36}
```
1. 마지막 셀 아래 결과가 표시됩니다.